www.fitnessapplication.co.uk- a fitness website that i created
www.charlotte-slack.co.uk my personal website with work ive created on it
Thursday 10 March 2011
Wednesday 7 April 2010
Camera animation fly arounds
Well since I have completed all of the animations for my scene, it is now time to start doing the camera animation, I have been putting this off quite a bit as I know its going to be very time consuming with render times etc, but atleast it gets me on track to be able to edit and put together my scene. I have had another go at the path animation tutorial: http://www.screencast.com/users/Neal/folders/Flash/media/d8bfa37a-8c1d-41c7-a95d-fcd00d594273 that I failed so miserabley at previously and it seems to have gotten a bit better, I think I'm getting the hang of it, hopefully I will become more confident with it with time as I am going to have to do around 8 or more of them I think to show off everything in my scene. I have a few blender files with various aspects of my scene. I am going to do a path animation for each one, along with a straight on animated render, I will then not necessarily use all of this in my final 30 second animation, but will show them on my blog so that you can see what I have done, whilst it is being done. Some of the animated files will also need to be edited when put into premier so keep that in mind, if there are parts that dont look right.
This is a camera fly of the pond.
This is a full top view of the pond, I really like how you get the reflection of lampost in the water.
This is a camera fly of the pond.
This is a full top view of the pond, I really like how you get the reflection of lampost in the water.
This is a full shot of the grass.
This is a camera fly of the grass.
This is the front shot of the bin/rubbish.
This is the camera fly of the bin/rubbish.
This is the front shot of the moving lampposts.
This is the camera path fly around of the lampposts.
This is the front view of the moving sign.
This is the camera fly of the moving sign.
This is the front view of the rain.
I have not done a camera fly of the rain as you can see it overall in the front view, and a camera fly would not give a different effect.
This is the camera fly of the ball seats.
This is the front view of the ball seats.
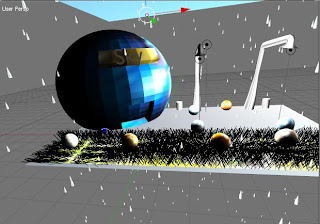
This is the full animation of the ball seats/sign/lampposts, as they were all done within the same file, whereas everything else was done in its own file, so I thought it might be nice to render it out as a whole, as it would be viewed within the file.
The next stage is to put all of these files into 'Adobe premier pro' so that I can edit them together to make a final animation. I have decided to put 'Jump in the pool' by 'Friendly Fires' as the background music to the animation, as I wanted a song that was easy to listen to so that anyone would enjoy viewing the animation. I also thought that I could edit the pond animations to fit in perfectly with the line 'jump in the pool', it seems like the perfect choice.
Wednesday 24 March 2010
Animation Project Sketches
When designing and thinking of new ideas I usually find it easier to draw them down so that I have some idea of what I will be creating. Below are the sketches that I drew when designing what I was going to do for my animation.

This is a rough sketch of the planet seats moving around into different positions and scales. The effect will be created using keyframe animation on movement and scale.

This is a rough sketch of the planet seats moving around into different positions and scales. The effect will be created using keyframe animation on movement and scale.

This is a rough sketch of the sign moving around as though it is on its hinges moving around in the wind. The moving sign will be created by using key frame animation.

This is a rough sketch of the rubbish blowing out of the bin in the wind, it shows the rough path the rubbish will take. The movement of the rubbishb will be done using key frame animation.

This is a rough sketch of what the pond will look like. I will be using fluids to create the moving water effect.

This is a rough sketch of the lamposts shaking in the wind, this will be done by using key frame animation.

The rain effect is the only effect that covers the entire model, I will use particles to get this effect that rain is over the model area.

I will make the grass move as though it is windy. This will be done by adding an empty and playing around with the settings.
Friday 19 March 2010
Animation: Week 8
Well the tutorials this week were slightly different. More a modelling aspect rather than animation. I have done some weighting in Maya before so the idea is not lost to me.
The tutorials showed full characters with armatures atached as I did not have these files I decided to show the general idea with shapes, to show how it is done. Both tutorials were basicly the same thing but just showing different ways of doing it, I followed both anyway. The below screenshots were from the first tutorial, I found that I got a better response from the first one, it was more noticable than the second one, as I was able to weight the same mesh at different weights.


Rather than the second one which didnt take to it aswell, it would let me weight it but only the overall mesh. It was interesting to visit this area again, just a shame I wont need to use it for my project.

Sunday 14 March 2010
Animation: Week7
This week we learnt about motion capture, it was really interesting to learn about as it was something that I havent done before. This weeks task was to import a BVH file into blender and see what the motion capture looks like in there. I am currently having a problem with an error coming up, but I hope this will be resolved soon.
Well after looking back at it theres still a problem, but as this isn't a skill i'm going to need for my project there isn't a worry to get it fixing, atleast I tried.
Well after looking back at it theres still a problem, but as this isn't a skill i'm going to need for my project there isn't a worry to get it fixing, atleast I tried.
Sunday 7 March 2010
My Project
Below are my findings with tutorials that I have found useful when creating my final project. Some of which were necessary for me to learn how to do do things that I couldnt work out how to do very well on my own.
 Here is a screenshot of the rain in motion, currently in the middle of a render of the rain which is taking forever. I think it has come out quite well. The overall effect I am going for is a windy one. To add to this effect I will have wind shaken lamposts, sign, grass and rubbish out of the bin. Once this has rendered I will add each one and do a render as the detail progresses. I then need to make the planet seats move around and create birds to fly in the sky, however I am currently unsure whether I will add them to the same file or create each aspect in a different one.


Below is a screenshot of the pond added to the scene, I have created it on a different file as it was too slow to try and edit and move around otherwise. You can't really see the detail on this shot as the water does move, that can only be seen in the animation, however what I can say is that the water moves naturally and I'm really happy with the result.The first of these was how to make rain, as I wanted to have rain in the background of my scene. I found http://feeblemind.tuxfamily.org/dotclear/index.php/2004/12/24/4-blender-faire-pleuvoir---making-rain very useful when trying to do this. The tutorial helped me out, but to be honest the effect is created from particles which I have already tried in a past tutorial in class. I did have to play around with the tutorial as I had a few problems getting the rain to go downwards onto my scene, as for some reason it was going up in the air, no idea why but after some rotating I manged to fix it.
 Here is a screenshot of the rain in motion, currently in the middle of a render of the rain which is taking forever. I think it has come out quite well. The overall effect I am going for is a windy one. To add to this effect I will have wind shaken lamposts, sign, grass and rubbish out of the bin. Once this has rendered I will add each one and do a render as the detail progresses. I then need to make the planet seats move around and create birds to fly in the sky, however I am currently unsure whether I will add them to the same file or create each aspect in a different one.
Right So i've just spent 2 hours waiting for the file to render and it had an error as it came towards the end so I dont think I'll be doing any animation renders for a while, I'll just document my progress with images until a later date, when hopefully the animation render will begin to work again.
Below are some images of the planet seat key frame animations:


The below screenshot shows the current stage of animation, so far the sign, lamposts and planet seats have been animated. Rain has also been animated on a different file. The sign, lamposts and planet seats were created using keyframes I found these two tutorials very useful for this: http://www.screencast.com/users/Neal/folders/Flash/media/77702fe9-8c56-41b9-817a-728ef125dbf2 and http://www.screencast.com/users/Neal/folders/Flash/media/e9ea8293-025f-4183-8df1-6185c3aa7a79

The below screenshot is the rubbish flying out of the bin and around the scene. I decided to make it a page from a newspaper and gave it a newspaper image as the texture. I think it works really well. To create rthe flying rubbish I created a series of key frames I found these tutorials really useful for that: http://www.screencast.com/users/Neal/folders/Flash/media/77702fe9-8c56-41b9-817a-728ef125dbf2 and http://www.screencast.com/users/Neal/folders/Flash/media/e9ea8293-025f-4183-8df1-6185c3aa7a79


I wanted to create realistic moving grass so that it looks as though it is swaying in the wind, I found this tutorial really helpful for this: http://www.blenderguru.com/the-secret-to-creating-realistic-grass/.
Below is my result, the screenshot doesnt really give it justice but it will be more noticeable in the end animation itself.

Friday 5 March 2010
Animation: Week 6
This week we had a fluid task to follow. I found the task really interestng and the effect created was just beautiful. I wouldnt call it a simple skill though, takes a lot to get it looking just right. 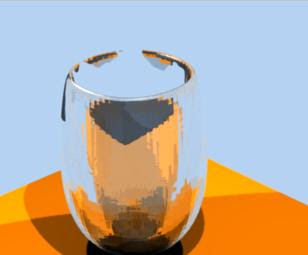 This is a screenshot of the tutorial towards the end with the round glass and water at the top, the effect cant really be shown well in a screenshot so here is a render of it as an animation as a whole. The render took around an hour and a half to render out.
 This is the glass as a square shape rather than a round shape.
 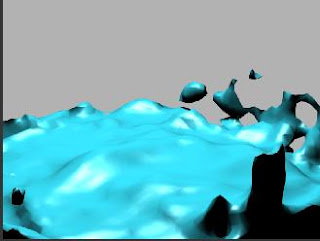 The last part of the task this week was to create something of our own. I decided to create some stairs that went into a big splash. I think the animation looks really good and effective. I think it would be a really useful technique when creating something like the ocean.
 This is a screenshot of the tutorial towards the end with the round glass and water at the top, the effect cant really be shown well in a screenshot so here is a render of it as an animation as a whole. The render took around an hour and a half to render out.
 This is the glass as a square shape rather than a round shape.
 The last part of the task this week was to create something of our own. I decided to create some stairs that went into a big splash. I think the animation looks really good and effective. I think it would be a really useful technique when creating something like the ocean.
Subscribe to:
Posts (Atom)
